A Class of Service (CoS) is essential for managing access to system features and controlling the dialing capabilities of extensions/trunks/IVRs. By configuring classes of service, you can define which features and call routes are available to different extensions, thereby enhancing the security, efficiency, and cost control of your communication system.
- Before creating a Class of Service, it’s required to set up the following components:
- Feature Category, allows you to create groups of feature codes, which can be associated with a Class of Service. This helps restrict access to sensitive feature codes for specific users or extensions.
- Dial Restrictions allow administrators to effectively manage and enforce dialing restrictions based on defined patterns and configurations.
- Route Selection, allows administrators to configure how calls are routed based on specific criteria, ensuring efficient handling and routing of calls across the system.
How to create a Feature Category
- Navigate to the Feature Categories Module
- In the main menu, go to PBX > Class of Service > Feature Categories.
- Configure the GENERAL Tab

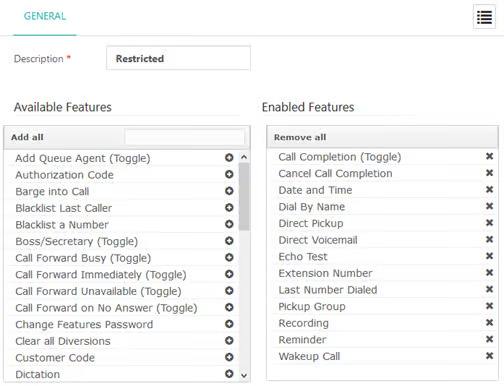
- Description: Enter a unique title to identify this feature category.
3. Manage Enabled Features
- In the Available Features section, select the feature codes you want to include in this category.
- You can add feature codes in two ways:
- Add individually: Click the + button next to each feature code you want to add.
- Add all: Use the “Add all” button to add all available feature codes at once.
- To remove feature codes from the Enabled Features section:
- Remove individually: Click the x button next to each enabled feature code you want to remove.
- Remove all: Use the Remove all button to clear all enabled feature codes at once.
4. Save Configuration by clicking the Save button
How to create Dial Restrictions
- Navigate to the Dialing Restriction Rules Module
- In the main menu, go to PBX > Class of Service > Dialing Restriction Rules.
- Configure the GENERAL Tab

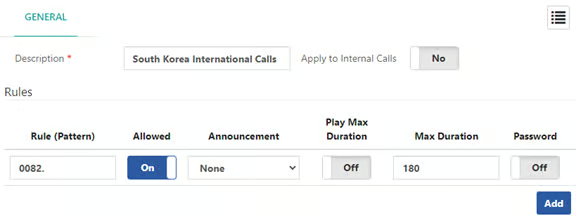
- Description: Enter a meaningful title to identify this Dialing Restriction Rule.
3. Configure the Rules Section
- Rule (Pattern): Add a rule pattern in your dial plan that matches one or more possible dialed numbers.
- Example: To restrict calls to South Korea (where 0082 is the country code), use the pattern “0082.” This pattern matches numbers that start with “0082” followed by any number of digits.
- Other examples are:
- 5555555: This pattern matches specific numbers like “5555555”.
- 5555XXX: This pattern matches numbers starting with “5555” followed by any combination of three additional digits (e.g., “5555123”).
- 2NNN: This pattern matches numbers starting with “2” followed by three digits from 2 to 9 (e.g., “2123”, “2999”).
- [157-9]XXXX: This pattern matches numbers where the first digit can be 1, 5, 7, 8, or 9, followed by any combination of four additional digits (e.g., “51234”, “79999”).
- 2!: This pattern matches numbers starting with “2” followed by zero or more additional digits and/or characters (e.g., “2”, “2345”).
- : This pattern matches any number starting with a single digit from 0 to 9, followed by any number of additional digits and/or characters. It’s often used for external calling, like “9” + any number (e.g., “91234”, “9555123”).
- Allowed: Set it to Yes to allow the dialing pattern.
- Max Duration: Set the maximum call duration in seconds. For example, for the South Korea Rule Pattern (0082.), you can restrict the call duration to 180 seconds.
- Optionally, configure additional settings such as Announcement to play if a call attempt is made to this number, or a password to secure the rule.
4. Save Configuration by clicking the Save button
How to create a Route Selection
- Navigate to the Route Selections Module
- In the main menu, go to PBX > Class of Service > Route Selections.
- Configure the GENERAL Tab

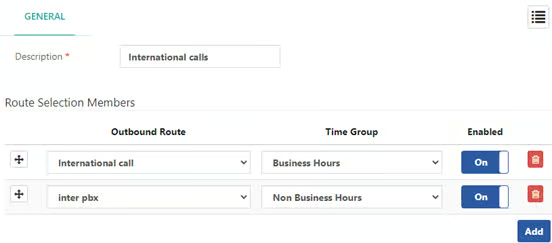
- Description: Enter a unique description to identify this Route Selection.
3. Configure the Route Selection Members Section
- Outbound Route: Choose an existing outbound route to associate with this selection. Configure Outbound Routes by navigating to PBX > External > Outbound Routes.
- Time Group: Select an existing time group to apply to this route selection. If no time group is associated, the route selection will always be applied. Configure Time Groups by navigating to PBX > Incoming Calls > Time Groups.
- Enabled: Toggle to enable or disable this route selection.
- Click Add to include additional route selection members.
How to create a class of service
- Navigate to the Class of Service Module
- In the main menu, go to PBX > Class of Service > Class of Service.
- Configure the GENERAL Tab

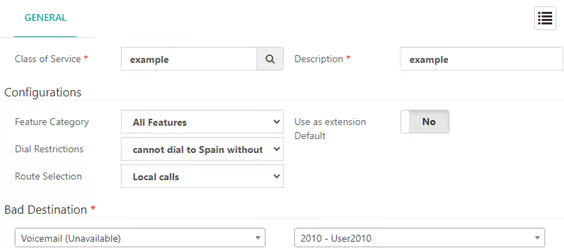
- Class of Service: Enter a unique and meaningful Class of Service name.
- Description: Enter a free-text description to describe the purpose of this Class of Service.
3. Setup the Configurations Section:
- Feature Category: Select the Feature Category configured in the “How to Create a Feature Category” section.
- Dial Restrictions: Select the Dial Restrictions configured in the “How to Create Dial Restrictions” section.
- Route Selection: Select the Route Selection configured in the “How to Create Route Selection” section.
- Optionally, set this Class of Service as the default for all new extensions by toggling Use as Extension Default to Yes.
4. Configure the Bad Destination section
- Bad Destination: Select a module and destination for handling calls to unroutable destinations. If there is no route to the dialed destination, the call will be sent to the specified Bad Destination. For example, you can set an extension’s voicemail as the Bad Destination for this CoS.
5. Save Configuration by clicking the Save button
Example: Creating a Class of Service
This example will guide you through creating a Class of Service (CoS) with specific configurations for feature categories, route restrictions, and route selections. It includes the following steps:
1. Start with the configuration of the modules that a CoS requires:
- First, create a feature category.
- Set up dial restrictions if needed.
- Create a route selection.
- Then, create the Class of Service.
2. Create the Class of Service:
- Select the feature category, dial restrictions, and route selection, and configure the bad destination as necessary.
This flow ensures a structured approach to setting up your CoS while covering all essential configurations.
Feature Category
1. Navigate to the Feature Categories Module
Go to PBX > Class of Service > Feature Categories.
2. Configure the GENERAL Tab
- Description: Enter a unique title, e.g., “Basic Features.”
3. Manage Enabled Features
- In the Available Features section, select the feature codes you want to include, e.g. call forwarding.
4. Save Configuration
Click the Save button to save your configuration.
Dialing Restriction
1. Navigate to the Dialing Restriction Rules Module
Go to PBX > Class of Service > Dialing Restriction Rules.
2. Configure the GENERAL Tab
Description: Enter a meaningful title, e.g., “International Call Restriction.”
3. Configure the Rules Section
Rule (Pattern): Add a rule pattern to match calls to South Korea:
Pattern: “0082.” to restrict calls to South Korea (where 0082 is the country code).
Allowed: Set to Yes to allow the pattern.
Max Duration: Set to 180 seconds (restricting calls to South Korea to 3 minutes).
Announcement: Optionally, select an announcement to play if a call attempt is made to this number.
4. Click the Save button to save your configuration.
Route Selection
1. Navigate to the Route Selections Module
Go to PBX > Class of Service > Route Selections.
2. Configure the GENERAL Tab
Description: Enter a unique description, e.g., “Business Hours Routing.”
3. Configure the Route Selection Members Section
Outbound Route: Choose an existing outbound route, e.g., “International Route”
Time Group: Select an existing time group, e.g., “Business Hours” If no time group is associated, the route selection will always be applied.
Enabled: Toggle to enable this route selection.
Click Add to include additional route selection members if necessary.
4. Click the Save button to save your configuration.
Class of Service Creation
1. Navigate to the Class of Service Module
Go to PBX > Class of Service > Class of Service in the main menu.
2. Configure the GENERAL Tab
Class of Service: Enter a unique name, e.g., “Limited International.”
Description: Enter a description, e.g., “Class of Service for restricting international calls and managing features.”
3. Setup the Configurations Section
Feature Category: Select the Feature Category that will be created in the next section. From the available list of Features selected in the Feature Categories Module (PBX > Class of Service > Feature Categories), select the feature codes you want to include.
Dial Restrictions: Select the Dial Restrictions that will be created to limit calls to South Korea.
Route Selection: Select the Route Selection that includes time groups that will be created in the next section.
Bad Destination: Select a module and destination for handling calls to unroutable destinations. e.g., configure an extension’s voicemail as the Bad Destination for this CoS.
4. Click the Save button to save your configuration.
Callflow Explanation
- Extension: The extension represents the device (phone) used by the user. Each extension must be assigned a Class of Service.
- Class of Service: The Class of Service (“Limited International”) defines the features, route selection, and routing rules for the extension.
- Route Selection: Determines which outbound routes are used based on the time group and other criteria. It allows for dynamic routing decisions, ensuring calls are routed through the appropriate outbound routes depending on the time group defined.
- Outbound Route: The outbound route (“International Route”) determines how calls are routed out of the CPBX5 system. It connects to the appropriate trunk defined.
- Trunk: The trunk is the physical or virtual connection to the telephone network, enabling external calls.
By following these steps, you can create a Class of Service that limits specific dialing capabilities and routes calls efficiently based on predefined criteria.
